
Three.js 的核心可以说是它的场景图(scene graph)。场景图在 3D 引擎是一个图中节点的层次结构,其中每个节点代表了一个局部空间(local space)。
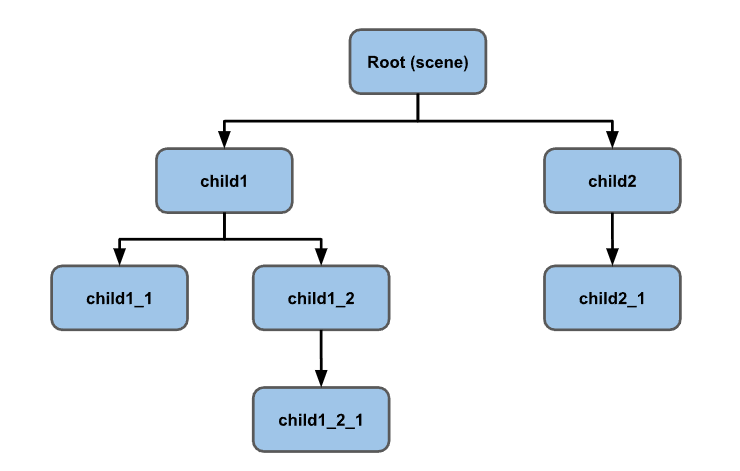
这有点抽象,所以我们试着举一些例子。
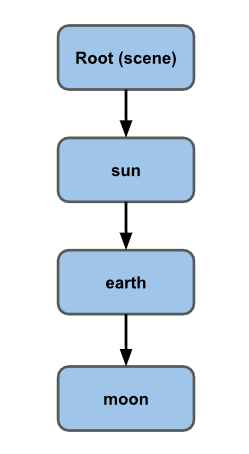
比如这样一个例子:太阳系、太阳、地球、月亮。
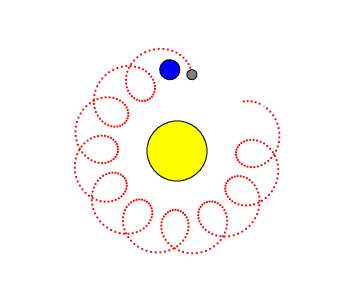
地球绕着太阳转,月球绕着地球转,月球绕着地球转了一圈。从月球的角度看,它是在地球的 "局部空间 "中旋转。尽管它相对于太阳的运动是一些疯狂的像螺线图一样的曲线,但从月球的角度来看,它只需要关注自身围绕地球这个局部空间的旋转即可。
换个角度想,生活在地球上的你,不用思考关于地球自转和绕太阳公转的问题。你只是走路或开车或游泳或跑步,好像地球从未移动或者旋转。你走路、开车、游泳、跑步、生活在地球这个 "局部空间",即使相对于太阳来说,你是以每小时 1000 英里的速度绕着地球旋转,并以每小时 6 万 7 千英里的速度围绕太阳旋转。你在太阳系中的位置与头上的月亮相似,但你不必担心自己的位置。你只需担心你在地球 "局部空间 "中相对于地球的位置。
让我们一步一步来吧。想象一下,我们要做一个太阳、地球和月亮的图。我们先从太阳开始,只需制作一个球体,并将其置于原点。注意:我们用太阳、地球、月亮来演示如何使用场景图。当然,真正的太阳、地球和月亮使用的是物理学,但为了我们的目的,我们将用场景图来伪造它。
// 要更新旋转角度的对象数组
const objects = [];

// 一球多用
const radius = 1;
const widthSegments = 6;
const heightSegments = 6;
const sphereGeometry = new THREE.SphereGeometry(
  radius,
  widthSegments,
  heightSegments
);

const sunMaterial = new THREE.MeshPhongMaterial({ emissive: 0xffff00 });
const sunMesh = new THREE.Mesh(sphereGeometry, sunMaterial);
sunMesh.scale.set(5, 5, 5); // 扩大太阳的大小
scene.add(sunMesh);
objects.push(sunMesh);
我们使用的是一个低多边形球体(low-polygon sphere)。赤道周围只有 6 个分段。这是为了便于观察旋转情况。
因为我们会重用同一个球体,所以我们将太阳网格(sunMesh)的比例设置为 5x。
我们还将 phong 材质的 emissive 属性设置为黄色。phong 材质的放射属性(emissive)是基本上不受其他光照影响的固有颜色。光照会被添加到该颜色上。
我们也在场景的中心放置了一个点光源(point light)。稍后我们会介绍更多关于点光源的细节,但现在简单地说,点光源代表从一个点向各个方向发射的光源。
  const color = 0xffffff;
  const intensity = 3;
  const light = new THREE.PointLight(color, intensity);
  scene.add(light);
为了便于观察,我们要把摄像头放在原点的正上方向下看。最简单的方法是使用 lookAt 函数。 lookAt 函数让摄像机从它的位置“看向”我们传递 lookAt 的位置。在这样做之前,我们需要告诉摄像机的顶部朝向哪个方向,或者说哪个方向是摄像机的 "上"。对于大多数情况来说,正 Y 是向上的就足够了,但是由于我们是直视下方,我们需要告诉摄像机正 Z 是向上的。
const camera = new THREE.PerspectiveCamera(fov, aspect, near, far);
camera.position.set(0, 50, 0);
camera.up.set(0, 0, 1);
camera.lookAt(0, 0, 0);
在渲染循环中,根据之前的例子进行了调整,我们用这段代码旋转 objects 数组中的所有对象。
objects.forEach((obj) => {
  obj.rotation.y = time;
});
由于我们将 sunMesh 添加到 objects 数组中,它将会旋转。
现在让我们把地球(earth)也加进去。
const earthMaterial = new THREE.MeshPhongMaterial({
  color: 0x2233ff,
  emissive: 0x112244,
});
const earthMesh = new THREE.Mesh(sphereGeometry, earthMaterial);
earthMesh.position.x = 10;
scene.add(earthMesh);
objects.push(earthMesh);
我们做的材料是蓝色的,但是我们给它加了少量的放射蓝(emissive blue),这样它就会在我们的黑色背景下显示出来。
我们使用相同的 sphereGeometry 和新的蓝色的 earthMaterial 来制作一个 earthMesh 。我们将其定位在太阳的左边 10 个单位,并将其添加到场景中。由于我们将它添加到了我们的 objects 数组中,所以它也会旋转。
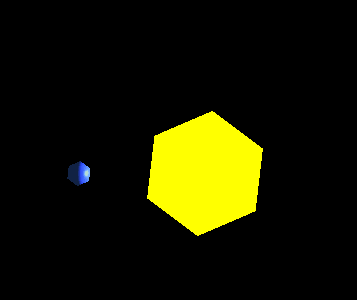
你可以看到太阳和地球都在自转,但地球并没有绕着太阳转。让我们把地球变成太阳的子节点吧。
sunMesh.add(earthMesh);
然后
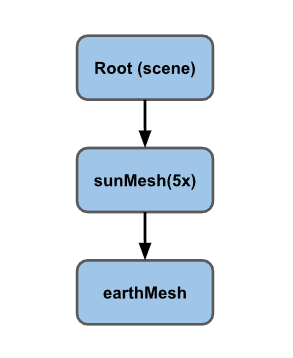
到底发生了什么?为什么地球和太阳一样大?为什么离太阳这么远?我居然要把摄像机从 50 单位移到 150 单位以上才能看到地球。
我们让 earthMesh 成为 sunMesh 的一个子节点。sunMesh.scale.set(5, 5, 5) 将其比例设置为 5x。这意味着 sunMeshs 的局部空间是 5 倍大。这表示地球现在大了 5 倍,它与太阳的距离 ( earthMesh.position.x = 10 ) 也是 5 倍。
目前,我们的场景图是这样的:
为了解决这个问题,我们添加一个空的场景图节点。我们将把太阳和地球都作为该节点的子节点。
const solarSystem = new THREE.Object3D();
scene.add(solarSystem);
objects.push(solarSystem);

const sunMaterial = new THREE.MeshPhongMaterial({emissive: 0xFFFF00});
const sunMesh = new THREE.Mesh(sphereGeometry, sunMaterial);
sunMesh.scale.set(5, 5, 5);
solarSystem.add(sunMesh);
objects.push(sunMesh);

const earthMaterial = new THREE.MeshPhongMaterial({color: 0x2233FF, emissive: 0x112244});
const earthMesh = new THREE.Mesh(sphereGeometry, earthMaterial);
earthMesh.position.x = 10;
solarSystem.add(earthMesh);
objects.push(earthMesh);
这里我们创建了一个 Object3D 。像 Mesh 一样,它也是场景图中的一个节点,但与 Mesh 不同的是,它没有材质(material)和几何体(geometry)。它只是代表一个局部空间。
我们的新场景图是这样的:
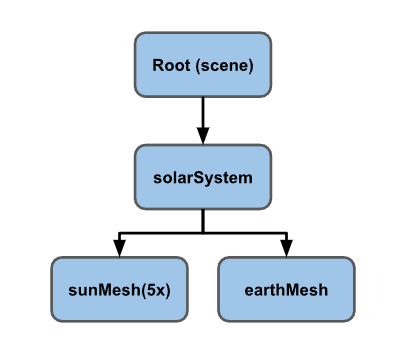
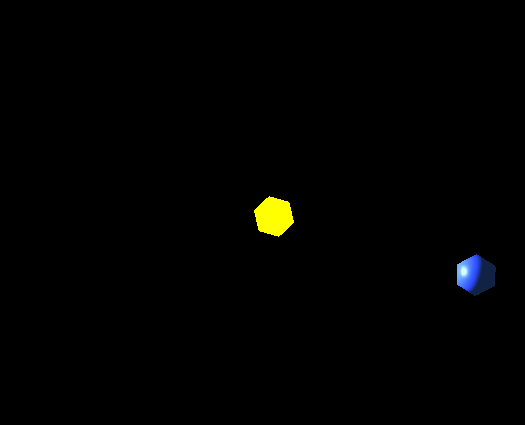
sunMesh 和 earthMesh 都是 solarSystem 的子网格。三者都在旋转,现在因为 earthMesh 不是 sunMesh 的子网格,所以不再按 5 倍比例缩放。
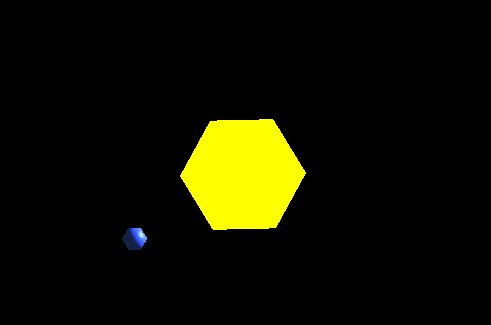
好多了。地球比太阳小,而且绕着太阳转的同时自转。
延续同样的模式,我们再加一个月亮。
const earthOrbit = new THREE.Object3D();
earthOrbit.position.x = 10;
solarSystem.add(earthOrbit);
objects.push(earthOrbit);

const earthMaterial = new THREE.MeshPhongMaterial({color: 0x2233FF, emissive: 0x112244});
const earthMesh = new THREE.Mesh(sphereGeometry, earthMaterial);
earthOrbit.add(earthMesh);
objects.push(earthMesh);

const moonOrbit = new THREE.Object3D();
moonOrbit.position.x = 2;
earthOrbit.add(moonOrbit);

const moonMaterial = new THREE.MeshPhongMaterial({color: 0x888888, emissive: 0x222222});
const moonMesh = new THREE.Mesh(sphereGeometry, moonMaterial);
moonMesh.scale.set(.5, .5, .5);
moonOrbit.add(moonMesh);
objects.push(moonMesh);
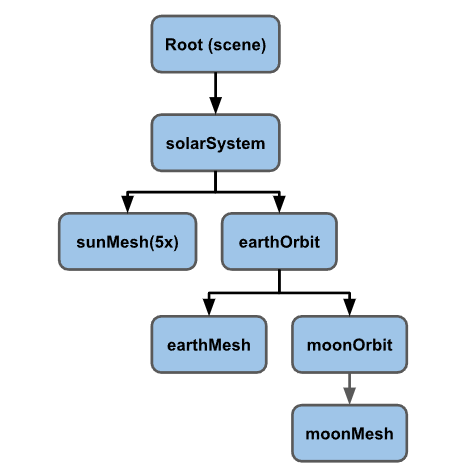
我们再次添加了更多的隐形场景图节点。首先是一个名为 earthOrbit 的 Object3D ,并将新增 earthMesh 和 moonOrbit 都添加到其中。然后,我们把 moonMesh 添加到 moonOrbit 上。
新的场景图是这样的:
就是这样

你可以看到月亮照着本文开头所提到的螺线图形式旋转,但我们不必手动计算它。我们只需要设置我们的场景图来为我们做这件事。
绘制一些东西来可视化场景图中的节点通常很有用。Three.js 有一些很有帮助的,ummmm, 帮助工具可以用来 ummmm,...帮助我们实现这个功能。
其中一个叫做 AxesHelper 。它画了 3 条线,分别代表本地的 X, Y, 以及 Z轴。让我们为我们创建的每个节点都加上一个。
// 为每个节点添加一个AxesHelper
objects.forEach((node) => {
  const axes = new THREE.AxesHelper();
  axes.material.depthTest = false;
  axes.renderOrder = 1;
  node.add(axes);
});
在我们的例子中,我们希望轴即使在球体内部也能出现。要做到这一点,我们将其材质(material)的 depthTest 属性设置为 false,这意味着它们不会检查其是否在其他东西后面进行绘制。我们还将它们的 renderOrder 属性设置为 1(默认值为 0),这样它们就会在所有球体之后被绘制。否则一个球体可能会画在它们上面,把它们遮住。
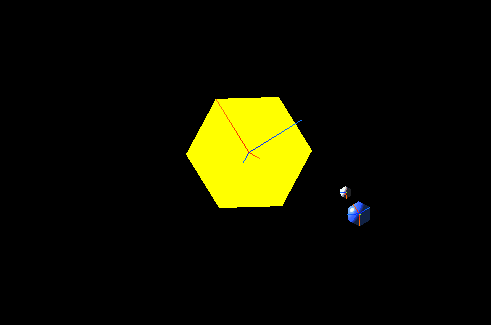
我们可以看到x (红色) 和 z (蓝色)轴。由于我们是直视下方,而每个物体只是围绕 y 轴旋转,所以我们看不到y (绿色)轴。
可能很难看到其中一些轴,因为有 2 对重叠的轴。sunMesh 和 solarSystem 都在同一位置。同样地,earthMesh 和 earthOrbit 也在同一位置。让我们添加一些简单的控制方法,让我们可以为每个节点打开/关闭它们。同时,我们还可以添加另一个名为 GridHelper 的帮助工具。它可以在 X,Z 平面上创建一个 2D 网格。默认情况下,网格是 10x10 单位。
我们还将使用lil-gui,这是一个在 three.js 项目中非常流行的 UI 库。lil-gui 会获取一个对象和该对象上的属性名,并根据属性的类型自动生成一个 UI 来操作该属性。
我们要为每个节点制作一个 GridHelper 和一个 AxesHelper。我们需要为每个节点添加一个标签,所以我们将删除旧的循环,转而调用一些函数为每个节点添加帮助程序。
function makeAxisGrid(node, label, units) {
  const helper = new AxisGridHelper(node, units);
  gui.add(helper, 'visible').name(label);
}

makeAxisGrid(solarSystem, 'solarSystem', 25);
makeAxisGrid(sunMesh, 'sunMesh');
makeAxisGrid(earthOrbit, 'earthOrbit');
makeAxisGrid(earthMesh, 'earthMesh');
makeAxisGrid(moonOrbit, 'moonOrbit');
makeAxisGrid(moonMesh, 'moonMesh');
makeAxisGrid 创建了一个 AxisGridHelper 类,这是一个我们将创建的让 lil-gui 满意的类。就像上面说的那样,lil-gui 会自动地生成一个 UI 来操作某个对象的命名属性。它将根据属性的类型创建不同的 UI。我们希望它创建一个复选框,所以我们需要指定一个 bool 属性。但是,我们希望坐标轴和网格都能基于一个单一的属性出现/消失,所以我们将创建一个类,其有一个属性绑定了 getter 和 setter。这样我们就可以让 lil-gui 认为它在操作一个单一的属性,但是在内部我们可以为一个节点设置 AxesHelper 和 GridHelper 的可见(visible)属性。
// 打开/关闭轴和网格的可见性
// lil-gui 要求一个返回类型为bool型的属性
// 来创建一个复选框,所以我们为 `visible`属性
// 绑定了一个setter 和 getter。 从而让lil-gui
// 去操作该属性.
class AxisGridHelper {
  constructor(node, units = 10) {
    const axes = new THREE.AxesHelper();
    axes.material.depthTest = false;
    axes.renderOrder = 2; // 在网格渲染之后再渲染
    node.add(axes);

    const grid = new THREE.GridHelper(units, units);
    grid.material.depthTest = false;
    grid.renderOrder = 1;
    node.add(grid);

    this.grid = grid;
    this.axes = axes;
    this.visible = false;
  }
  get visible() {
    return this._visible;
  }
  set visible(v) {
    this._visible = v;
    this.grid.visible = v;
    this.axes.visible = v;
  }
}
需要注意的是,我们将 AxesHelper 的 renderOrder 设置为 2,将GridHelper的设置为 1,这样轴就会在网格之后绘制。否则网格可能会覆盖轴。
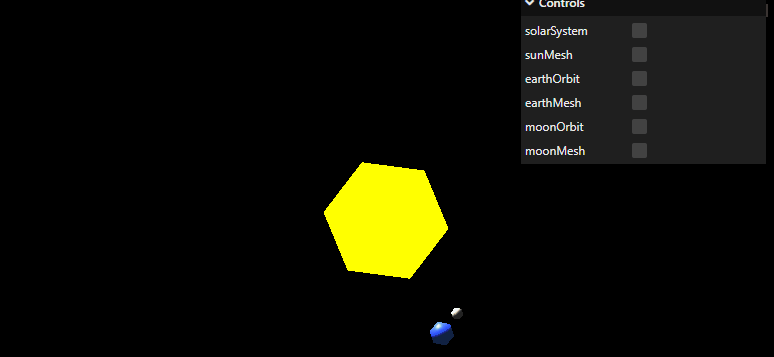
选中 solarSystem,你会看到地球是如何像我们上面设定的那样,从中心出发正好 10 个单位。你可以看到地球是如何处在 solarSystem 的局部空间(local space)内。同样地,如果你打开 earthOrbit,你会看到月球距离 earthOrbit 的局部空间(local space)的中心正好 2 个单位。
再举几个场景图的例子。在一个简单的游戏世界中,一辆汽车可能有这样的场景图。
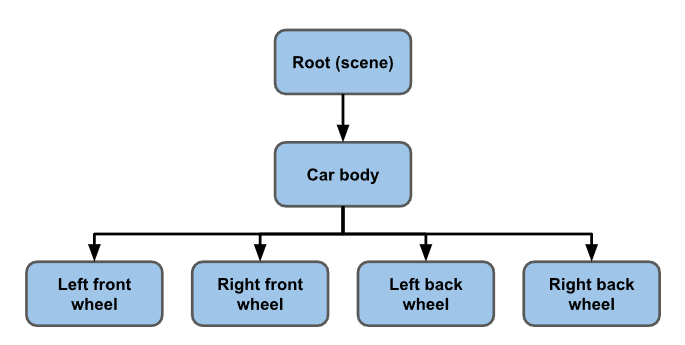
如果你移动车体,所有的轮子都会随之移动。如果你想让车身和轮子分开弹跳,你可以将车身和轮子作为代表汽车框架的框架(frame)节点的子节点。
另一个例子是游戏世界中的人类。
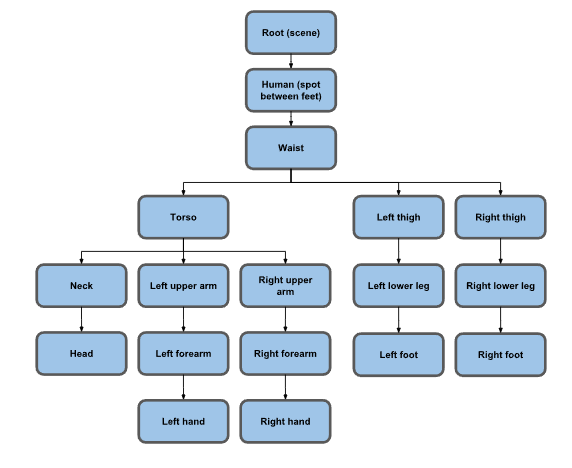
你可以看到对于人类来说,场景图会变得很复杂。事实上,上面的场景图已经被简化了。例如,你可以把它扩展到覆盖每根手指(至少还有 28 个节点)和每个脚趾(还有 28 个节点),再加上脸部和下巴、眼睛,也许还有更多。
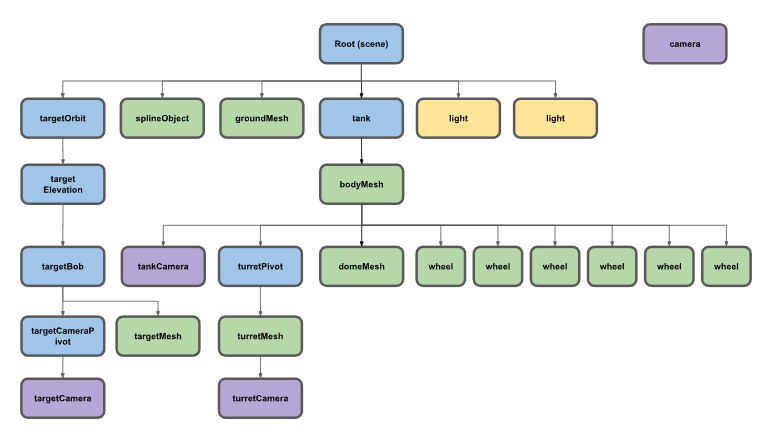
我们来做一个稍微复杂的场景图。我们来做一辆坦克。坦克将有 6 个轮子和一个炮塔。坦克会沿着一条路径行驶。会有一个球体在周围移动,坦克会瞄准球体。
这是场景图。网格(mesh)的颜色为绿色,Object3D 为蓝色,灯光(light)为金色,摄像机(camera)为紫色。其中一台摄像机没有被添加进场景图。
 在代码中查看这些节点的设置。
对于目标,也就是坦克要瞄准的东西,有一个 targetOrbit ( Object3D ),它的旋转方式与上面的 earthOrbit 一样。targetElevation ( Object3D )是 targetOrbit 的一个子节点,它提供了一个从 targetOrbit 的偏移量和一个基准高度。它的子节点是另一个叫做 targetBob 的 Object3D,它只是相对于 targetElevation 上下摆动。最后是 targetMesh,它只是一个立方体,我们可以旋转并改变它的颜色。
// 移动目标
targetOrbit.rotation.y = time * 0.27;
targetBob.position.y = Math.sin(time * 2) * 4;
targetMesh.rotation.x = time * 7;
targetMesh.rotation.y = time * 13;
targetMaterial.emissive.setHSL((time * 10) % 1, 1, 0.25);
targetMaterial.color.setHSL((time * 10) % 1, 1, 0.25);
对于坦克来说,有一个叫做 tank 的 Object3D,用来移动它下面的所有子节点。代码中使用了 SplineCurve,其接受用来定义曲线的一系列坐标为参数。0.0 是曲线的起始点,1.0 是曲线的终点。它首先获取当前的位置,也就是放置坦克的位置。然后获取在曲线稍远处的位置,并使用 Object3D.lookAt 将坦克指向该方向。
const tankPosition = new THREE.Vector2();
const tankTarget = new THREE.Vector2();

...

// 移动坦克
const tankTime = time * .05;
curve.getPointAt(tankTime % 1, tankPosition);
curve.getPointAt((tankTime + 0.01) % 1, tankTarget);
tank.position.set(tankPosition.x, 0, tankPosition.y);
tank.lookAt(tankTarget.x, 0, tankTarget.y);
由于坦克顶部的炮塔是坦克的子节点,所以它会自动移动。如果要将它指向目标,我们只需要获取目标的世界位置(world position),然后再次使用 Object3D.lookAt。
const targetPosition = new THREE.Vector3();

...

// 炮台瞄准目标
targetMesh.getWorldPosition(targetPosition);
turretPivot.lookAt(targetPosition);
有一个 turretCamera,它是 turretMesh 的一个子节点,所以它会随着炮塔上下移动和旋转。我们让它瞄准目标。
// 让turretCamera瞄准目标
turretCamera.lookAt(targetPosition);
还有一个 targetCameraPivot,它是 targetBob 的子节点,所以它随着目标漂浮。我们将其瞄准坦克。它的目的是让 targetCamera 与目标本身偏移。如果我们把摄像头变成 targetBob 的子节点,并且只瞄准摄像头本身,那么它就会在目标内部。
// 让targetCameraPivot看向坦克
tank.getWorldPosition(targetPosition);
targetCameraPivot.lookAt(targetPosition);
最后,我们旋转所有的车轮
wheelMeshes.forEach((obj) => {
  obj.rotation.x = time * 3;
});
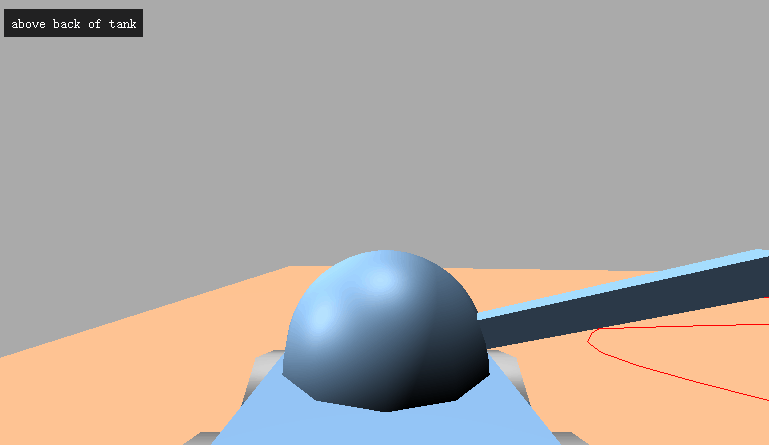
对于摄像机,我们在初始化时设置了一个包含所有 4 台摄像机的数组,并附有描述。
const cameras = [
  { cam: camera, desc: "detached camera" },
  { cam: turretCamera, desc: "on turret looking at target" },
  { cam: targetCamera, desc: "near target looking at tank" },
  { cam: tankCamera, desc: "above back of tank" },
];

const infoElem = document.querySelector("#info");
并在渲染时循环使用我们的摄像机。
const camera = cameras[(time * 0.25) % cameras.length | 0];
infoElem.textContent = camera.desc;
我希望这能让你对场景图的工作原理以及你可能使用它们的方法有一些了解。制作 Object3D 节点,并将东西作为它们的子节点,是使用好 three.js 这样的 3D 引擎的重要一步。通常来说,让东西按照你想要的方式移动和旋转可能需要一些复杂的数学来。例如,如果没有场景图,计算月亮的运动或者汽车的轮子相对于车身的位置会非常复杂,但是使用场景图就会变得简单很多。
import * as THREE from 'three';

function main() {
  const canvas = document.querySelector('#c');
  const renderer = new THREE.WebGLRenderer({canvas: canvas});
  renderer.setClearColor(0xAAAAAA);
  renderer.shadowMap.enabled = true;

  function makeCamera(fov = 40) {
    const aspect = 2;  // the canvas default
    const zNear = 0.1;
    const zFar = 1000;
    return new THREE.PerspectiveCamera(fov, aspect, zNear, zFar);
  }
  const camera = makeCamera();
  camera.position.set(8, 4, 10).multiplyScalar(3);
  camera.lookAt(0, 0, 0);

  const scene = new THREE.Scene();

  {
    const light = new THREE.DirectionalLight(0xffffff, 1);
    light.position.set(0, 20, 0);
    scene.add(light);
    light.castShadow = true;
    light.shadow.mapSize.width = 2048;
    light.shadow.mapSize.height = 2048;

    const d = 50;
    light.shadow.camera.left = -d;
    light.shadow.camera.right = d;
    light.shadow.camera.top = d;
    light.shadow.camera.bottom = -d;
    light.shadow.camera.near = 1;
    light.shadow.camera.far = 50;
    light.shadow.bias = 0.001;
  }

  {
    const light = new THREE.DirectionalLight(0xffffff, 1);
    light.position.set(1, 2, 4);
    scene.add(light);
  }

  const groundGeometry = new THREE.PlaneGeometry(50, 50);
  const groundMaterial = new THREE.MeshPhongMaterial({color: 0xCC8866});
  const groundMesh = new THREE.Mesh(groundGeometry, groundMaterial);
  groundMesh.rotation.x = Math.PI * -.5;
  groundMesh.receiveShadow = true;
  scene.add(groundMesh);

  const carWidth = 4;
  const carHeight = 1;
  const carLength = 8;

  const tank = new THREE.Object3D();
  scene.add(tank);

  const bodyGeometry = new THREE.BoxGeometry(carWidth, carHeight, carLength);
  const bodyMaterial = new THREE.MeshPhongMaterial({color: 0x6688AA});
  const bodyMesh = new THREE.Mesh(bodyGeometry, bodyMaterial);
  bodyMesh.position.y = 1.4;
  bodyMesh.castShadow = true;
  tank.add(bodyMesh);

  const tankCameraFov = 75;
  const tankCamera = makeCamera(tankCameraFov);
  tankCamera.position.y = 3;
  tankCamera.position.z = -6;
  tankCamera.rotation.y = Math.PI;
  bodyMesh.add(tankCamera);

  const wheelRadius = 1;
  const wheelThickness = .5;
  const wheelSegments = 6;
  const wheelGeometry = new THREE.CylinderGeometry(
      wheelRadius,     // top radius
      wheelRadius,     // bottom radius
      wheelThickness,  // height of cylinder
      wheelSegments);
  const wheelMaterial = new THREE.MeshPhongMaterial({color: 0x888888});
  const wheelPositions = [
    [-carWidth / 2 - wheelThickness / 2, -carHeight / 2,  carLength / 3],
    [ carWidth / 2 + wheelThickness / 2, -carHeight / 2,  carLength / 3],
    [-carWidth / 2 - wheelThickness / 2, -carHeight / 2, 0],
    [ carWidth / 2 + wheelThickness / 2, -carHeight / 2, 0],
    [-carWidth / 2 - wheelThickness / 2, -carHeight / 2, -carLength / 3],
    [ carWidth / 2 + wheelThickness / 2, -carHeight / 2, -carLength / 3],
  ];
  const wheelMeshes = wheelPositions.map((position) => {
    const mesh = new THREE.Mesh(wheelGeometry, wheelMaterial);
    mesh.position.set(...position);
    mesh.rotation.z = Math.PI * .5;
    mesh.castShadow = true;
    bodyMesh.add(mesh);
    return mesh;
  });

  const domeRadius = 2;
  const domeWidthSubdivisions = 12;
  const domeHeightSubdivisions = 12;
  const domePhiStart = 0;
  const domePhiEnd = Math.PI * 2;
  const domeThetaStart = 0;
  const domeThetaEnd = Math.PI * .5;
  const domeGeometry = new THREE.SphereGeometry(
    domeRadius, domeWidthSubdivisions, domeHeightSubdivisions,
    domePhiStart, domePhiEnd, domeThetaStart, domeThetaEnd);
  const domeMesh = new THREE.Mesh(domeGeometry, bodyMaterial);
  domeMesh.castShadow = true;
  bodyMesh.add(domeMesh);
  domeMesh.position.y = .5;

  const turretWidth = .1;
  const turretHeight = .1;
  const turretLength = carLength * .75 * .2;
  const turretGeometry = new THREE.BoxGeometry(
      turretWidth, turretHeight, turretLength);
  const turretMesh = new THREE.Mesh(turretGeometry, bodyMaterial);
  const turretPivot = new THREE.Object3D();
  turretMesh.castShadow = true;
  turretPivot.scale.set(5, 5, 5);
  turretPivot.position.y = .5;
  turretMesh.position.z = turretLength * .5;
  turretPivot.add(turretMesh);
  bodyMesh.add(turretPivot);

  const turretCamera = makeCamera();
  turretCamera.position.y = .75 * .2;
  turretMesh.add(turretCamera);

  const targetGeometry = new THREE.SphereGeometry(.5, 6, 3);
  const targetMaterial = new THREE.MeshPhongMaterial({color: 0x00FF00, flatShading: true});
  const targetMesh = new THREE.Mesh(targetGeometry, targetMaterial);
  const targetOrbit = new THREE.Object3D();
  const targetElevation = new THREE.Object3D();
  const targetBob = new THREE.Object3D();
  targetMesh.castShadow = true;
  scene.add(targetOrbit);
  targetOrbit.add(targetElevation);
  targetElevation.position.z = carLength * 2;
  targetElevation.position.y = 8;
  targetElevation.add(targetBob);
  targetBob.add(targetMesh);

  const targetCamera = makeCamera();
  const targetCameraPivot = new THREE.Object3D();
  targetCamera.position.y = 1;
  targetCamera.position.z = -2;
  targetCamera.rotation.y = Math.PI;
  targetBob.add(targetCameraPivot);
  targetCameraPivot.add(targetCamera);

  // Create a sine-like wave
  const curve = new THREE.SplineCurve( [
    new THREE.Vector2( -10, 0 ),
    new THREE.Vector2( -5, 5 ),
    new THREE.Vector2( 0, 0 ),
    new THREE.Vector2( 5, -5 ),
    new THREE.Vector2( 10, 0 ),
    new THREE.Vector2( 5, 10 ),
    new THREE.Vector2( -5, 10 ),
    new THREE.Vector2( -10, -10 ),
    new THREE.Vector2( -15, -8 ),
    new THREE.Vector2( -10, 0 ),
  ] );

  const points = curve.getPoints( 50 );
  const geometry = new THREE.BufferGeometry().setFromPoints( points );
  const material = new THREE.LineBasicMaterial( { color : 0xff0000 } );
  const splineObject = new THREE.Line( geometry, material );
  splineObject.rotation.x = Math.PI * .5;
  splineObject.position.y = 0.05;
  scene.add(splineObject);

  function resizeRendererToDisplaySize(renderer) {
    const canvas = renderer.domElement;
    const width = canvas.clientWidth;
    const height = canvas.clientHeight;
    const needResize = canvas.width !== width || canvas.height !== height;
    if (needResize) {
      renderer.setSize(width, height, false);
    }
    return needResize;
  }

  const targetPosition = new THREE.Vector3();
  const tankPosition = new THREE.Vector2();
  const tankTarget = new THREE.Vector2();

  const cameras = [
    { cam: camera, desc: 'detached camera', },
    { cam: turretCamera, desc: 'on turret looking at target', },
    { cam: targetCamera, desc: 'near target looking at tank', },
    { cam: tankCamera, desc: 'above back of tank', },
  ];

  const infoElem = document.querySelector('#info');

  function render(time) {
    time *= 0.001;

    if (resizeRendererToDisplaySize(renderer)) {
      const canvas = renderer.domElement;
      cameras.forEach((cameraInfo) => {
        const camera = cameraInfo.cam;
        camera.aspect = canvas.clientWidth / canvas.clientHeight;
        camera.updateProjectionMatrix();
      });
    }

    // move target
    targetOrbit.rotation.y = time * .27;
    targetBob.position.y = Math.sin(time * 2) * 4;
    targetMesh.rotation.x = time * 7;
    targetMesh.rotation.y = time * 13;
    targetMaterial.emissive.setHSL(time * 10 % 1, 1, .25);
    targetMaterial.color.setHSL(time * 10 % 1, 1, .25);

    // move tank
    const tankTime = time * .05;
    curve.getPointAt(tankTime % 1, tankPosition);
    curve.getPointAt((tankTime + 0.01) % 1, tankTarget);
    tank.position.set(tankPosition.x, 0, tankPosition.y);
    tank.lookAt(tankTarget.x, 0, tankTarget.y);

    // face turret at target
    targetMesh.getWorldPosition(targetPosition);
    turretPivot.lookAt(targetPosition);

    // make the turretCamera look at target
    turretCamera.lookAt(targetPosition);

    // make the targetCameraPivot look at the at the tank
    tank.getWorldPosition(targetPosition);
    targetCameraPivot.lookAt(targetPosition);

    wheelMeshes.forEach((obj) => {
      obj.rotation.x = time * 3;
    });

    const camera = cameras[time * .25 % cameras.length | 0];
    infoElem.textContent = camera.desc;

    renderer.render(scene, camera.cam);

    requestAnimationFrame(render);
  }

  requestAnimationFrame(render);
}

main();
html
<style>
  html, body {
    height: 100%;
    margin: 0;
  }
  #c {
    width: 100%;
    height: 100%;
    display: block;
  }
  #info {
    position: absolute;
    left: 1em;
    top: 1em;
    background: rgba(0,0,0,.8);
    padding: .5em;
    color: white;
    font-family: monospace;
  }

</style>
<canvas id="c"></canvas>
<div id="info"></div>
<script  type="importmap">{
  "imports": {
  "three": "https://threejs.org/build/three.module.js"
  }
  }</script><!-- Remove this when import maps will be widely supported -->
<script async src="https://unpkg.com/es-module-shims@1.3.6/dist/es-module-shims.js"></script>